Recently I experimented with making mustard. I started with this recipe for a Spicy Beer Mustard that I found in Food and Wine Magazine. The flavor was great, but be warned - the recipe makes a huge amount of mustard! Definitely enough to share. I ended up adding even more mustard powder and seeds than the recipe called for. In the end, I was pretty happy with it but have been wanting to try out some different recipes.
Luckily, today I stumbled upon this post on the awesome blog Food In Jars. I have never canned anything, but I love this blog and am thinking it may inspire me to give it a try one of these days.
The mustard post is actually a guest post, written by Kaela Porter of the blog Local Kitchen, another fine and inspiring blog with many lovely photos.
Enjoy the blogs, and enjoy making mustard! I plan to make another batch soon, and will report back.
Tuesday, August 23, 2011


Wednesday, August 17, 2011
Lotta Frittata
Lately I've been going to the farmers market every week, sometimes twice per week, and the produce has been blowing my mind. I've developed a sweet summer ritual of making a frittata every week with fresh farm eggs from the market, and whatever produce I pick up there. Lately that's been corn that is explosively sweet, sometimes chard or potatoes, and sometimes squash and fresh herbs from our garden. Tonight's frittata featured corn, chard, sweet red onions & juicy early girl tomatoes from the market, basil & sliced padron peppers from our garden, and shaved imported parmesan. The simple tastes of summer abundance. It doesn't get much better than that and I'm savoring it as it comes and enjoying it while it's here.
Friday, August 05, 2011
Hello, Summer. And Thank You, Portuguese Bringer of the Fava Beans!
I'm finally sitting down after a good five hours spent in the kitchen, and wow. It was such spontaneous joy.
It all started with a little Portuguese woman. I don't know who she is, only that my co-worker Todd knows her, and that every year around this time, she brings him garbage bags full of fava beans. And he never has the heart to tell her that actually, he just isn't quite up to growing callouses on his thumbs to shell & peel them, and so he brings them to work & implores that we take them off his hands. And that is how I find myself, once a year, with my own callouses after having shelled & peeled a big old mess of them like I did tonight, so they could enjoy a starring role in tonight's amazing impromptu summer bounty bachelor dinner!
That's right! No pizza or mac & cheese for this gal tonight. Tonight was all about those fava beans...

and shaved zucchini from our garden...

... and lots of other garden goodies too, like sweet as can be cherry tomatoes, cool and crunchy cucumbers that I can hardly believe I finally managed to grow, preserved lemon from our bountiful tree, and freshly cut parsley & marjoram (and shallots from the farmers market!).

It all would have been perfect just like that, but then there were fresh eggs from Riverdog Farm that I couldn't resist poaching in homemade vegetable broth, because I had just made it using all the ends of the vegetables from the week, so why not enjoy it right away?
All this chopping and slicing and poaching and shucking and shelling served as the perfect way to pass the time for hours while a big batch of granola slowly baked to perfection. Lots of dear friends & loved ones have birthdays or other occasions they're celebrating right about now, and I bet you can guess what they'll be getting from me! Yes, all my love and some of my granola. The gift that tastes good *and* keeps you regular!

But, I digress a little. There's no recipe really, nor much of a point to all my rambling tonight. I just had to stop & share my pure joy & gratitude for the fact that summer is here, and for all the sweet, crunchy, tender, vibrant gifts that come with it. Thank you, summer, and thank you, Todd, and most of all, thank you, little Portuguese woman of mystery for helping me to complete this warm & breezy summer night!
It all started with a little Portuguese woman. I don't know who she is, only that my co-worker Todd knows her, and that every year around this time, she brings him garbage bags full of fava beans. And he never has the heart to tell her that actually, he just isn't quite up to growing callouses on his thumbs to shell & peel them, and so he brings them to work & implores that we take them off his hands. And that is how I find myself, once a year, with my own callouses after having shelled & peeled a big old mess of them like I did tonight, so they could enjoy a starring role in tonight's amazing impromptu summer bounty bachelor dinner!
That's right! No pizza or mac & cheese for this gal tonight. Tonight was all about those fava beans...

and shaved zucchini from our garden...

... and lots of other garden goodies too, like sweet as can be cherry tomatoes, cool and crunchy cucumbers that I can hardly believe I finally managed to grow, preserved lemon from our bountiful tree, and freshly cut parsley & marjoram (and shallots from the farmers market!).

It all would have been perfect just like that, but then there were fresh eggs from Riverdog Farm that I couldn't resist poaching in homemade vegetable broth, because I had just made it using all the ends of the vegetables from the week, so why not enjoy it right away?
All this chopping and slicing and poaching and shucking and shelling served as the perfect way to pass the time for hours while a big batch of granola slowly baked to perfection. Lots of dear friends & loved ones have birthdays or other occasions they're celebrating right about now, and I bet you can guess what they'll be getting from me! Yes, all my love and some of my granola. The gift that tastes good *and* keeps you regular!

But, I digress a little. There's no recipe really, nor much of a point to all my rambling tonight. I just had to stop & share my pure joy & gratitude for the fact that summer is here, and for all the sweet, crunchy, tender, vibrant gifts that come with it. Thank you, summer, and thank you, Todd, and most of all, thank you, little Portuguese woman of mystery for helping me to complete this warm & breezy summer night!
Tuesday, July 26, 2011
You May Want Your Own Tagine for This One
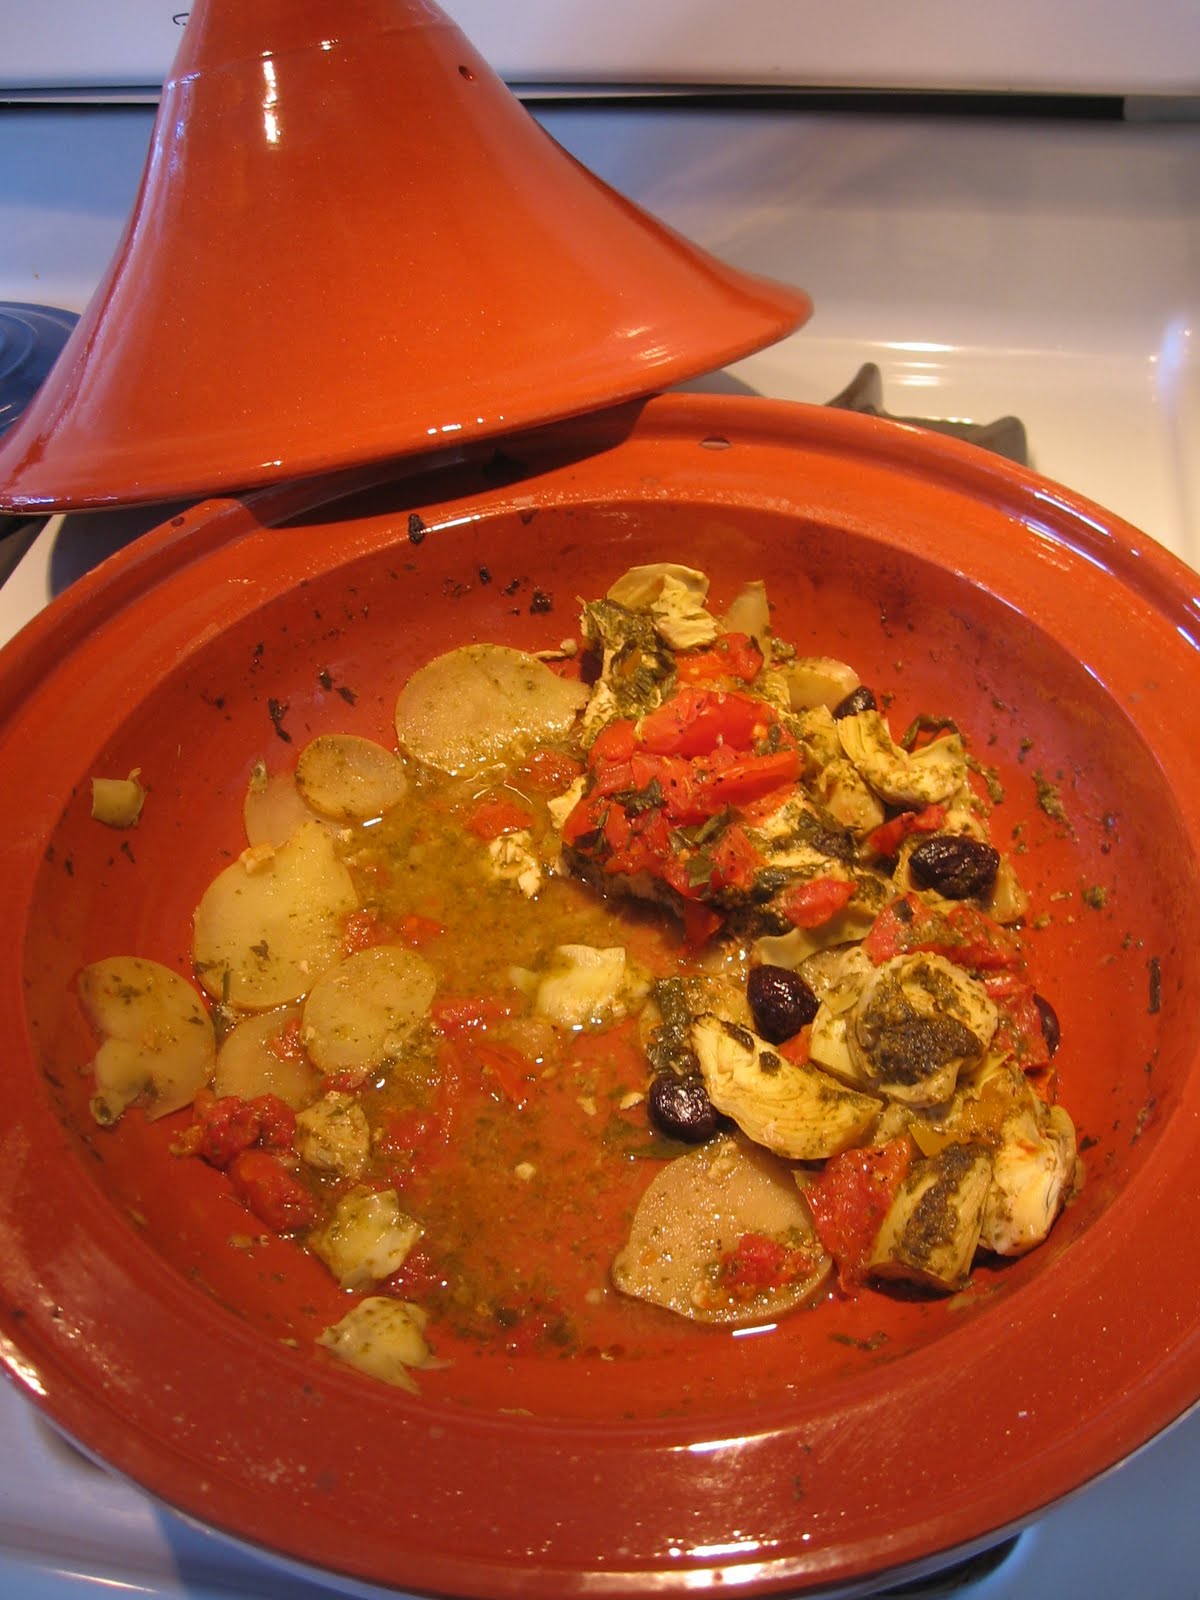
Today, like many days, was spent more in the kitchen and garden than in any other place or pursuit. The kind of day that just thrills me. There have been so, so many of those days recently and I realize that I haven't been documenting them much, but tonight I'm here to change that.
You see, tonight I tried out a recipe that my dear friend Ari (amazing chef and musician) passed along to me, along with her adaptations, that she'd found via the SF Chronicle. I added a small adaptation of my own, popped it into the oven and waited with great anticipation while out in the garden planting a new batch of lettuces, greens and herbs. And when that timer went off and it was time to take it out of the oven, and more importantly, when it was time to eat it, I couldn't get over how wonderful it was. I served it with a quinoa pilaf I made that was inspired by the cous cous recipe in this posting, and all told, it was one of the finer meals I've made so far this year. Too good not to share.
And so here I am, sharing.

Original recipe says to use "halibut, true cod or any other firm fish". I used a couple of swordfish steaks that together equaled about a pound. The original recipe calls for only about a 1/2 cup of diced tomatoes, but Ari suggested using more, and so I did - and since I had them, I added some preserved lemons too. Ari suggested making some extra chermoula sauce cause it's so damn good, and using canned artichoke hearts instead of futzing with fresh ones, which I happily did, because I just so happened to have a can of them sitting on the shelf, which is what inspired me to attempt this recipe in the first place. Lastly, my little mister isn't a fan of the cilantro, so I used much more parsley and much less cilantro, and no one was any the wiser!
The tagine calls for a chermoula sauce which, besides adding incredible depth of flavor, adds moisture to the dish and helps all the ingredients to come out juicy, tender and so very succulent. Instead of using the extra sauce for dipping, as Ari suggested, I used it to flavor the quinoa pilaf.
Fish Tagine with Olives, Potatoes and Artichokes, with Quinoa Pilaf:
For the Sauce:
1 1/2 cups parsley leaves
1/2 cup cilantro leaves
1/2 small yellow onion
4 garlic cloves
1/4 cup extra virgin olive oil
2 T. lemon juice
1 t. salt
1 t. pepper
1 t. paprika
1/2 t. cumin
1/4 t. cinnamon
For the Tagine:
2 halibut, swordfish, true cod or sea bass or other firm-fish steaks, about 1 pound total, and ideally about 3/4 inch thick
1 can artichoke hearts, cut into quarters
2 t. olive oil
2 medium potatoes, sliced very thin
1 t. salt
1 t. pepper
16 oil cured black olives
1 to 2 cups diced tomatoes, with their juices (I used early girls from the farmers market!)
1/4 preserved lemon, diced
chopped parsley & cilantro to taste
For the Pilaf:
3/4 cup quinoa, rinsed
1 1/2 cup water
Chermoula sauce
1 - 2 T. dried cranberries
1/4 preserved lemon, diced
2 scallions, diced
1/4 c. diced parsley & cilantro, in whatever ratio you like
1/4 c. diced green olives
To Make the Sauce:
Combine all sauce ingredients in a blender or food processor. Blend until smooth. Add more olive oil if needed.
Take half the sauce and coat the fish on both sides, and refrigerate the fish for an hour or up to 3 hours.
To assemble the tagine, pre-heat the oven to 350. Smear the olive oil on the bottom of the tagine. Add the potato slices - you should have enough for about 2 layers. Sprinkle with salt & pepper. Top with the fish steaks. Scatter the artichokes & olives over & around the fish. Dot with half of the reserved sauce, the tomatoes & their juices, more salt & pepper and a final sprinkling of the chopped herbs.
Put the cover on the tagine & bake for about 1 hour & 15 minutes, until the potatoes are tender and the fish is moist, tender & simply divine.
Since the tagine magically makes a broth that is nothing less than transformative, it's good to have some bread or a pilaf to soak it all up.
To make the quinoa pilaf:
Bring the quinoa, water & chermoula sauce to a boil, along with a bit of salt and the dried cranberries. Cook for about 15-20 minutes or until all liquid is absorbed & quinoa is tender. Off the heat, stir in the preserved lemon, scallions, herbs & olives.
To serve:
Spoon some of the quinoa pilaf into a bowl and top with a spoonful of the fish, potatoes, artichokes & broth. Enjoy, savor and enjoy some more!
Friday, July 01, 2011
Garden Joy

On a brighter note, it seems like summer is finally, finally here! There is no end to the amount of thrills I get from going out to the garden every morning and every evening to see what has changed, what new blossom has appeared, what ripening has transpired in the twelve or so hours from when I checked it last. Every morning and every evening feel like Christmas used to feel when I was a kid - such surprise, wonder, delight and gratitude!
Tonight, I discovered the first tomatoes beginning to ripen. The same tomatoes that last night were green. It made my day, made my week, made me delirious with joy to know that the spot we've placed these girls turns out to be sunny enough after all.

And although the radishes we planted from seed a little over a month ago only netted a modest crop, I was and still am so delighted with each and every one of these beauties that I pulled from the dirt tonight.

There was also a questionable meyer lemon tree here when we moved in. We thought it might be diseased and considered cutting it down, but it has turned out to be a wild, lovely, incredible jackpot of fragrant, sweet lemony goodness that is still producing sweet gorgeous fruit, even now. There must be some kind of metaphor in there about how the thorny, hard to understand, imperfect situations bring the most growth and reward, but I'm not sure I'm feeling eloquent enough to put it into words just now.
I still feel like I hardly know what I'm doing, placing seeds in the soil and doing my best, hoping for the best, hoping nature cooperates, crossing my fingers, trying to learn, paying attention as best I can. It doesn't always work out, but it is so gratifying when it does. I'm sure it sounds cliche' but it is no less true: it's a lot like life. Best to enjoy the journey and celebrate and give thanks when it all works out. And tonight, I most certainly am.
Friday, June 24, 2011
Plenty

Tonight, rock star husband had a recording session, so for me it was a bachelor dinner night, but I wasn't in the mood for my usual old mac & cheese or pizza, and since I'd just gotten my hands on this inspiring collection of recipes thanks to my pals Jamie & Eve, I decided to dig right in and treat myself to a solo summer dinner as fine as anything I'd make for company.
The food was sweet comfort in the midst of difficult family times. My heart is pretty broken at how badly my Dad is struggling again even though he was here only a month ago and looking and feeling strong and healthy. And in the meantime there has been news that several of our other family members are struggling too, despite everyone's best efforts to be healthy and do all the right things. Sometimes I feel myself going down that dark road where I think, what does it even matter if you try to eat healthy, exercise, and do all those other things that are supposed to be good for you? As my friend Kathleen says, you still have to breathe the air. You still have to live in this world and come to the realization that cancer doesn't discriminate. Cancer doesn't care what you do. There's no eloquent way to phrase it. It just sucks.
So tonight, I cooked my worries away, at least temporarily, and enjoyed the fruits of my labors all by my lonesome. I practically jumped for joy at the goodness, the vibrance, the sheer freshness and delight of this perfect marriage of flavors and textures: lentils and watercress in a watercress vinaigrette with asparagus and manchego, a squeeze of lemon and toasted walnuts.
I adapted this recipe a bit - it called for walnut oil but I used toasted walnuts instead, and I used french lentils instead of green, because that's what I had in the house. I can't take too much raw garlic so instead of a raw clove, I used the piece of garlic that I'd cooked with the lentils, which was nicely mellowed but added just the right bit of subtle garlic flavor.
It was my first time using watercress at home. I've enjoyed that intensely peppery green in salads at restaurants, but never ventured to use it myself. And never would have considered pureeing it as part of the dressing while at the same time serving it as part of the salad - it's a winner, to be sure!
So without too much more adieu, I will post my adapted version of this recipe from this fabulous, inspiring book, which I can't wait to dive into further. I will urge you to make this for lunch or dinner while you can still get good asparagus, and to enjoy it, if you can, with someone you love. I will continue to give thanks for food, for family, for friends, and for every moment spent being healthy and strong in my body, and I will wish the same for you.

Lentils, Asparagus and Watercress
Adapted from Yotam Ottolenghi's recipe in Plenty
Serves 4 generously
1 cup french lentils
4 cups watercress, thick stocks removed
1/4 - 2/3 c. parsley (original recipe called for 2/3 cup but I only had about 1/4 cup on hand, so that's what I used)
1/2 cup olive oil (original recipe called for 2/3 cup, but to me, 1/2 cup seemed the right amount)
1 T. red wine vinegar
1 clove garlic
salt & pepper
1 large bunch asparagus (about 1 pound), cut into roughly 2 inch segments
shaved manchego cheese to taste
toasted walnuts to taste
lemon wedges
Rinse the lentils and place in a saucepan with plenty of fresh water and 1 plump clove of garlic, peeled and smashed, and 1 bay leaf. Bring to a boil and then lower to a simmer, add a generous sprinkling of salt, and cook until just tender. This could take about 20 to 30 minutes.
While the lentils are cooking, put half the watercress, the parsley, olive oil, vinegar, salt & pepper into your food processor. After the lentils have been cooking for about 10-15 minutes, fish out that clove of garlic and add it to the food processor. Blitz until smooth & creamy, and pour into a big salad bowl.
Once the lentils are tender, drain them well and dump them into the bowl with the dressing, and toss it all together while the lentils are still warm. Taste & adjust seasonings - you may well need more salt.
Steam or boil the asparagus for about 2 to 3 minutes, until just crisp-tender. Original recipe suggests boiling but I steamed them. I also think it would add another whole dimension of flavor if you grilled the asparagus!
Now it's time to serve the salad, warm or at room temperature. Add the drained asparagus to the lentils, and toss it all with the remaining watercress. Pile onto a plate or into a bowl and shave a little manchego over it, sprinkle a few toasted walnuts, and don't forget to squeeze a bit of lemon over it, which really serves to bring all the flavors together. Enjoy every bite, welcome summer, and then enjoy some more bites! You'll be so, so glad that you did.
Thursday, June 02, 2011
Hitched

Geez! It seems that now that I'm a married lady, I can't seem to get around to this here blog!
It's been a delightful couple of weeks of feasting and celebrating with friends and family. The truth is, I'm still taking it all in. We have the greatest friends and the most wonderful families, and I'm still completely blown away by what an awesome wedding ceremony and celebration we were able to have, thanks in large part to the kindness & generosity of our friends & families. The food was divine, the music outstanding, and the company could not have been better.
We had a pretty limited budget, and our friends came through BIG TIME, pitching in to take care of every last detail from the music to the food and drinks and organization and photographs and flowers...oh, the flowers!


It was so great that parents and sister came out and finally got to see the new house. I am incredibly grateful that my Dad was here & feeling good & strong, and it made me endlessly happy to make his favorite potato soup for him and the rest of the family.
There was much feasting, did I mention that? Some of the feasting was done at places like Venezia and The Lake Chalet, some of it was done at home. It was an extra treat to be able to cook with some of the food that was grown in our garden! A good time was had by all. We chose Venezia for the dinner the night of the wedding, suspecting that it would appeal to every last one of us, and we were right on the money. Classic Italian food done perfectly, excellent service too. And we had an excellent brunch at the Lake Chalet featuring not only great food and a stunning view, but a really good Bloody Mary, too.
The week passed way too quickly, and when it was over, there was a short honeymoon in Big Sur, a prelude to the not-so-short honeymoon in Italy that will happen in September (OMG! I FINALLY GET TO GO TO ITALY!!!). Big Sur was gorgeous as always, only much colder than it's been when we've been there in the past. But that didn't stop us from feasting and relaxing in front of the fire, nor did it stop some of us from enjoying a hot soak in the glorious outdoor tub!

Friday, April 29, 2011
Super Quick Smoky Chic Peas & Wilted Greens with Goat Cheese
Have I ever mentioned my love affair with smoked paprika, aka pimenton? I use it so often, in so many ways. Love, love, love that smoky goodness, in bean dishes, soups, stews, marinades. And these little cans that it comes in are great for storing pencils & pens when the can is empty, as an added bonus!


Now it's time to toss in your greens - I used a bunch of wild baby arugula. You could also use spinach, or perhaps coarsely chopped mustard greens or chard. Now would be a good time to add another sprinkling of salt, too.


If you didn't happen to have something at the ready, you might start cooking some rice or quinoa a few minutes before starting this dish so that it'd all be ready at the same time. Or you could just eat it with some crusty bread. It's highly adaptable and the perfect remedy for those times when you need something healthy & delicious but are running low on energy & time, which for me lately, seems to be all the time!

My love of paprika grows ever deeper on a night like tonight, when a little dash of it is added to a meal that took all of about ten minutes to make, and was thoroughly satisfying. Win-win!
You can make this with any kind of beans you have around, and any kind of greens too. If you happen to have creamy goat cheese around too, by all means, invite it to the party.
First, just mince some garlic and saute' it in a bit of olive oil over medium heat for a few minutes.

Next, add the chic peas...a cup or two if you've made them from scratch, or a whole can, rinsed & well drained, which is what I happened to have on hand tonight. Add a sprinkling of salt & pinch of crushed red pepper and cook for a few minutes, shaking the pan a couple of times. And then, add a little sprinkling, or a big sprinkling if you like, of smoked paprika. Stir to incorporate, and stop to appreciate just how delightful the kitchen is smelling right about now.

Now it's time to toss in your greens - I used a bunch of wild baby arugula. You could also use spinach, or perhaps coarsely chopped mustard greens or chard. Now would be a good time to add another sprinkling of salt, too.

Keep on stirring and once the greens are just wilted, it's time to flick in a few dollops of goat cheese, if you've got it. And around here, we're fairly addicted to it so we've almost always got it!

And before you know it, before you've even finished your first glass of wine, you're pretty much ready to eat. This dish is great to combine with a grain, and tonight we were lucky to have a delicious wheat berry salad that the lovely Kanteen was kind enough to share, and it was the perfect complement.

If you didn't happen to have something at the ready, you might start cooking some rice or quinoa a few minutes before starting this dish so that it'd all be ready at the same time. Or you could just eat it with some crusty bread. It's highly adaptable and the perfect remedy for those times when you need something healthy & delicious but are running low on energy & time, which for me lately, seems to be all the time!
Sunday, April 24, 2011
When Life Gives You Lemons, Make Lasagna!
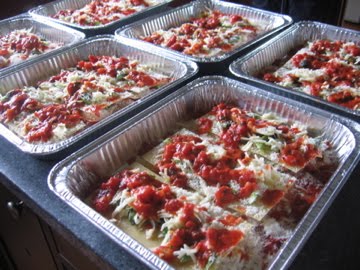
Last weekend I went to my friend Jamie's to prepare 7 lasagnas for the family wedding dinner, and my friend Erin showed up to help. We spent the day in Jamie's perfectly gorgeous, well set up, and inviting kitchen.

The week prior had been very trying on many levels. I had had a supposedly minor procedure to have a cyst on my eyelid taken care of, and ended up with a pretty massive, long lingering black eye afterwards. I looked like a serious victim of domestic violence. The day after the procedure, the honey and I had planned to go to SF City Hall to get our marriage license, but somehow it would have felt strange to show up there looking like I'd just been beaten!
And then, there was the obligatory pre-marital argument that turned into a major blowout, the kind of blowout that has one or both parties threatening to cancel the wedding, divide the possessions and just bail on this whole thing. Fortunately, that one ended in forgiveness, commitment in tact.
But the bad feelings were hard to shake, and by the time Sunday morning rolled around, I was feeling pretty wrecked and emotionally hungover. I would have spent the day in bed in the fetal position if I hadn't already signed up to do this, but there was no turning back. And spending the day with sweet, generous friends in a warm & inviting kitchen, cooking food with and for people I love turned out to be just the remedy to everything ailing me.
As an extra special, most kind and utterly generous gift, Jamie not only did all the shopping, but paid for everything - that would be something like twelve pounds of local asparagus and six pounds of fancy imported gruyere and parmesan from The Cheeseboard, not to mention many, many boxes of noodles and many, many cans of organic fire roasted tomatoes. It really was a perfect way to spend a day, and feels so good to have that task completed. Jamie was also kind enough to lend us his freezer to store all the lasagnas until the big day.


As if all of that wasn't enough, he served us a world-class lunch featuring meltingly tender Rancho Gordo yellow-eye beans and fresh cod slathered in miso and baked in tin foil, all served over mixed baby greens. All of it was just the remedy to soothe my soul, and a reminder once again of how fortunate I am.


As if all of that wasn't enough, he served us a world-class lunch featuring meltingly tender Rancho Gordo yellow-eye beans and fresh cod slathered in miso and baked in tin foil, all served over mixed baby greens. All of it was just the remedy to soothe my soul, and a reminder once again of how fortunate I am.

Monday, April 11, 2011
42 = The End of High Heels
Somehow my 42nd birthday came and went without my managing to attempt to turn the day into a national holiday. I actually had it in my head that it'd just be low key this year, but somehow the Universe (and my wonderful friends!) conspired to deliver quite a lot of fanfare in spite of this!
In the course of three days, I was treated to not only some wonderful company and inspired gifts, but also some seriously great food, including the acclaimed San Francisco institution Zuni Cafe, as well as other trusty East Bay favorites Dona Tomas and Burma Superstar, and new favorite Plum! More good food than a person has a right to eat! More good food than a woman who's going to try to squeeze into a wedding dress soon should even be attempting to eat! But, I did my best, oh yes I did!
One of the great things about turning 42 is that I feel like, for better or worse, I'm getting more comfortable at living in this body of mine, even when it gives me trouble. And BELIEVE ME, it gives me trouble, despite my best efforts to be good to it.
On my birthday, I was walking down the street looking live Olive Oyl, holding on to my honey's arm so I wouldn't trip as I walked in my mild 2-inch heels that I'd just bought. Mother f*cking DANSKO'S for f*cks's sake! Supposedly any old broad should be able to walk in these things! But alas, not me. I'd already twisted my ankle while walking in these shoes no less than THREE TIMES the previous weekend, and this was my last ditch attempt to try to train myself to walk in heels.... but I had to ask myself: why bother?!
Because really, the truth is, I'm a sneakers & cowboy boots kind of girl, and I have been for years. And in all my years of living, I've never had anyone in my life think less of me because I wasn't wearing heels, or more of me because I was. And as I gingerly tiptoed down that San Francisco street, desperately afraid of falling and twisting my ankle again, that realization sank in hard. In fact, my honey even asked me who exactly were these people I was trying to impress with my heels? Because he likes me no matter what.
So as I turned 42, my present to myself was the decision to ditch the heels and all the pretense that comes along with them, and focus instead on the things that really matter: the fact that I've got people who love me no matter what, and that I get to enjoy so much goodness on this earth and in this life. I've got quite a nice collection of cowboy boots and I just might be wearing them when I get married, and I'm happy about that!
Sunday, March 27, 2011
What's This Food?
Forgive the long pause.
I haven't one iota of inspiration lately, culinary or otherwise. The world is too sad a place these days. I feel extremely lucky for my kitchen, my home, my life, and everything and everyone in it, no question about that. But that is about all the enthusiasm I can seem to gather lately.
Although I'm not finding much inspiration in my own kitchen, I am enjoying learning learning about "new" and unusual foods through the podcast What's This Food. I love the concept of this show - a new food explored every single day of the year. From the host, Daniel Delaney's web site:
WTF, or "What's This Food?", is a daily web show that profiles commonly unknown or unusual food ingredients, techniques or dishes. As part of his New Year's resolution, Dan, the host, sets out to discover and learn about a new food each day in 2011.
That is seriously badass. I've been totally digging watching and listening to Dan's daily podcasts, and learning about foods like lotus root, persimmons, starfruit, ghee, bonito, and so much more! Check it out, and if you're so inclined, you can subscribe to the show via I-Tunes.
Here in the Bay area it's been raining for what feels like a couple of months. I'm not sure what my garden thinks about that. It's been dumping rain ever since we planted the latest batch of plants, and I'm pretty sure the peas have drowned. But, the beets do seem to be growing, as well as the arugula, kale and broccolini, little bit by little bit. And the compost heap is growing too. Now all we need is some of that magical sunshine to warm us all.
Thursday, February 17, 2011
In Praise of Kale and More Gardening Inspiration
Kale has been a favorite in our kitchen as of late. We were lucky to get a very nice harvest of it from our garden - it seemed to grow better than anything else we planted last Fall. Possibly because our garden doesn't get full sunlight, it seemed to take quite awhile to develop, but once it did, it developed quite nicely, and we've been eating a ton of it ever since.

I love to make kale chips, and I also have been adding a couple of leaves to my smoothies in the morning. Believe it or not, it blends right in and tastes just fine. I also like to slice it thin and enjoy it in salad. And it doesn't hurt that it's considered one of the world's healthiest foods!
This morning I stumbled upon this excellent article about kale on Bay Area Bites, and thought I'd share, as there are several great recipes listed that I'm looking forward to trying.

In other news, just last weekend we harvested what was left in the garden - mostly lots of greens, and made room for the next bunch of plants. Since our garden only seems to get what is considered "partial shade", especially at this time of year, we stuck mostly to greenish things - more kale (of course!) and broccolini, arugula, little gem lettuce, beets and sweet peas. The day we planted everything, a heavy storm blew in and the poor little plants have been getting pummeled by the rain and wind for days now, so I'm hoping they'll survive!
In my efforts to become more knowledgeable about gardening, I recently enjoyed reading Grow Great Grub by Gayla Trail, and learned a lot about how & when & even where to plant, even in small spaces or less than optimal conditions. Now I'm more inspired than ever to keep at it, and to grow more food than ever this year! Ms. Trail offers up so many handy tips in her book, including how to make your own compost, which is the next project I'm going to tackle, once that pesky, but much-needed rain, stops dumping out of the sky.
Thursday, January 27, 2011
Garden Inspiration
A couple of nights ago, I was lucky to catch Joan Gussow being interviewed by Novella Carpenter. I was already a fan of Novella's after having read her awesome book Farm City, and now I'm a fan of Joan's too. I bought her latest book Growing, Older, and haven't been able to put it down.
Both women are pioneers in their own ways, and both women know a thing or two about food, farming, and writing. It was truly a pleasure to hear their insights, and my only complaint was that it was too short! I could have listened to them for hours!
After spending a short while listening to these two witty, engaging and inspiring farmers talk about growing food, I came away more determined than ever to really learn to become a better gardener.
In our old place, we had the garden placed in an area where it received abundant sunlight, and although we had our share of challenges, I was constantly amazed that it seemed like all you had to do was plant the stuff, water it, pull weeds occasionally, and then reap the gorgeous fruits of your labors! We were fortunate to grow some incredible tomatoes, peppers and squash.
In the new place, the garden lives in an area that only gets sun later in the day, and definitely not for eight hours per day. We started with cool weather crops - lots of lettuce, and also chard, kale, broccoli, beets & cabbage. I'm thrilled to say that we harvested all the broccoli recently (see a few pics on my last posting) and although the crop wasn't prolific, it was tender and vibrant green and absolutely delicious! There has also been a ton of kale which has also turned out wonderfully, and I've been enjoying that, along with some chard which turned out only partially well, in my salads almost every day.
We were also very lucky that the yard came with a meyer lemon tree which, despite the need for serious pruning, still turned out bucket loads of top-notch fruit! In addition to giving bucket loads away, I made a pretty large batch of preserved lemons recently. I had to stop while eating my lunch today to appreciate that the great majority of food in my bowl came from our yard - kale, chard, broccoli, and preserved lemons, hurray!
As for the beets, they didn't fare so well because I forgot to thin them, and the jury is still out on the cabbage but it does seem to be growing. The lettuce did just fine but didn't quite thrill me the way the kale & broccoli did. Some of the lettuces and chard and beet greens developed some kind of brown rot and I never quite figured out what it was or what caused it.
The point I'm getting to here, is that there is still so much to learn! I feel like an absolute beginner, and I also feel that if I'm able to get this many good results when I barely know what I'm doing, I can hardly wait to see the kind of results I'll get once I apply myself a little more proactively!
But where to learn? I'd bought the book How to Grow More Vegetables but it seemed far to complex for an absolute beginner like me. Today I was poking around on the old interweb and I stumbled upon the Alameda County Master Gardeners site, which is a great resource for someone growing right here in Alameda County. Just perusing their site and clicking on their links, I've already learned a lot, and I am more excited than ever!
If anyone out there reading this has a good book to recommend for beginners, I'd love to hear about it.
In other news, can you believe I've nearly made it 21 days without coffee, sugar, alcohol, dairy, eggs, corn, gluten or soy! And would you believe that I've eaten better than ever during this time? It's true! I'm sure I will enjoy adding some of the things back into my diet that have been left out these last weeks, but I'm also really excited to continue many of the healthy habits that I've learned. The whole goal was to get to feeling good, and it feels good to be able say that I'm feeling good! Here's hoping this finds you feeling good too!
Sunday, January 23, 2011
Greetings From a Whole New World....
...Today is day 16 of a 21-day cleanse, during which I'm not consuming any alcohol, caffeine, sugar, gluten, corn, soy, dairy or eggs. And you know what? I feel pretty good!


Truth be told, I've had a few moments of cheating, including a couple of cups of green tea, and the other day I splurged on something that felt extremely decadent: "ice cream"! Actually it was sorbet from Scream Sorbet, my absolute favorite local "ice cream" shop. The flavor, coconut thai basil, was out of this world. It featured only four ingredients: coconut milk, basil, lime and sugar. Yes, white sugar is something I'm not supposed to be consuming right now but I won't beat myself up too much, for it was a tiny scoop, and I've done really really well with giving up all this other stuff, most of the time without feeling terribly deprived. But on this day, that little scoop of bliss was just what I needed! I think I could give up dairy forever as long as long as I knew that Scream Sorbet was around.
The first day without caffeine was beyond brutal, and I really wasn't prepared for how awful I would feel. I'd only been drinking half a cup a day, so I figured it wouldn't be a big deal to give it up, but oh, was I wrong. The pain in my head was absolutely unbearable, enough to make me think I might have to never touch coffee again, or if I do, then NEVER EVER GIVE IT UP AGAIN! So the next day, I drank a little green tea to help keep the headache at bay, and that seemed to work. I'm happy to report that now I'm doing just fine without the coffee or the green tea, and without all the other stuff too.
And as for the foods that I *am* eating, I'm loving them! Lots and lots of vegetables and fruit and some grains and legumes and fish. I'm not finding myself hungry during the day and I feel much more energetic, too. And I'm still having fun trying out new recipes, some of which I'll post soon, so don't despair! For now, I'll leave you with some pics of one of the first harvests from the garden at the new house - broccoli, chard and kale. Perfect timing cause I've been eating a LOT of that stuff lately!
Until next time, have some cheese/eggs/pizza/beer/wine/nachos/etc.... for me!


Thursday, January 06, 2011
In With the New
Suddenly it's 2011. Seems like it just crept up when I wasn't looking.
The last couple of the weeks of 2010 were pretty rough for me, what with losing my dear furry friend and then getting sick, so I didn't exactly feel as if I started this year with a bang. It was more like a pathetic little whimper. Although I'm almost entirely over the head cold sickness, I'm sure the heartsickness will be lingering for a long, long time. Damn, I miss that old gal.
On the up side, I had a wonderful visit with my family, and am happy to report that my Dad is doing great, and that I finally got to learn how to make the family recipe for sauce & meatballs & homemade pasta. Thanks, Dad! I'll make it one of my goals for 2011 to make it on my own and report back.
Along with the arrival of the new year, so too has the annual alcohol-free January arrived. I was really looking forward to it and feeling very excited about all the benefits: more energy, improved health, clearer skin, dropping a few pounds, sleeping better. But so far at least, my insomnia seems to be worse than ever, and I feel nothing but sluggish and uninspired. Nothing like feeling crappy to make a person want to drown her sorrows in red, red wine! I know, I know... it's only been 5 and 3/4 days! I'm not really giving up that easily.
In fact, today it occurred to me that since I'm already feeling so cruddy, I might as well go all the way with this detoxing thing and do a real cleanse, something I haven't attempted to do in years. So starting this Saturday, besides the alcohol, I'll also be losing dairy, gluten, soy, corn, caffeine & sugar for 21 days, something I've never attempted to do before (possibly because it's INSANE!!!). The goal is to get to the point of feeling good, but I imagine that before the feeling good starts, there's going to be a LOT more feeling bad. Oh well, I've felt bad before and I've gotten through it, and at least in this case, the feeling bad comes with a purpose.
Not sure how much posting I'll do in the next 3 weeks but will do my best to update periodically once I recover from the sheer shock of it!
For now, I'm wishing you all a very happy, healthy and inspired 2011! Feel free to have a glass of wine or three for me this month, won't you?
Saturday, December 25, 2010
Farewell, Old Friend

I didn't know much about raising a dog when I brought her home with me, and my learning process was trial by fire. It's hard to believe that the same little rascal who destroyed my apartment - speaker cables, window ledges, chairs, shoes, table legs, blinds, and anything else she could get her teeth on - grew into such a regal, mature, and dignified old soul.
Even though I adopted her, Lucio was her dear friend and trusted caretaker practically from day one, and she was also lucky to have many other human and dog friends throughout her long life. She grew up surrounded by live music, and would frequently just lay right down in front of the drum kit during our various rehearsals. She was happy as long as she could be right by our side, and it always troubled her greatly when the pack was separated. She loved to chase the ball and swim, and boy did she ever love to eat.
She did a lot of traveling with us over the years, and lived in many different places around Berkeley and Oakland, and even did a brief stint in Phoenix. When I look back on all the turns my life has taken over the last 14 years, it was always she who was the constant, she who held me up with her gentle loving presence no matter what kind of chaos was happening in my life.
When John and Bloom came into her life, John became yet another trusted caretaker & friend to Spider, and although it took her a little while to adjust to having a 150-pound "little" brother, Bloom idolized her and was always happy to be right by her side... which she didn't mind too much, as long has he didn't get too close. As she reached the end of her life, she tended to like to have more space to herself. but she was plenty happy to share the couch with Bloom. And in fact, the young dog taught the old dog a new trick. When she discovered that he got treats for rolling over, it didn't take her long at all to roll over herself!
Spider moved on from this world on December 22, 2010. Words can't express how heartbreaking it was to watch her become uncomfortable and pained in her old body, and to accept that it was time to let her go. In fact I had spent so much time dwelling on my fear of this, that I never stopped to consider that it could be a beautiful and moving experience, and it really was. I feel incredibly fortunate that when it was time, she was able to be surrounded by her closest loved ones - Lucio, John, Bloom and me. As heartbreaking as it was, we couldn't have asked for a better send off for her, and we knew without a doubt that this tired old soul was ready to go. In some small way, that made it easier. That, and knowing that she was loved by so many, every single moment of her life. She will always be loved, and we miss her very much.
If you click on the link at the beginning of this post, you'll be taken to a photo gallery of some pics of her throughout her life. I took some of the pics, and many of them were taken by Lucio, including the most awesome one at the beginning of this page. We love you, Spider!
Thursday, December 09, 2010
Tokyo Turnips

First, I bought some to include in a vegetable stew I was making. I'd had them once before at a catering job I was working at, where they were pickled Japanese style and I remembered loving them. I suspected that these turnips, so small and delicate, looked like they'd be good in my stew, instead of the larger ones that have a purple tinge.
After cleaning them and dicing them, I ate a cube raw. And then I ate another, and another, and another, until there were hardly any left to go into the stew! They have such a delicate flavor, so wintery and crunchy, sweet and juicy and a little bit spicy. They remind me of a cross between a radish and a turnip, and I find them totally addictive. And I love that you can eat them raw, or cook them. When you cook them, they become even more delicate and almost buttery. And you can, and should, cook the greens, and even the stems. There's nothing not to love about these babies!
So I put them into my stew, and they melded beautifully. And the next night, I put them into an Indian-style stew with black-eyed peas, kabocha squash and coconut milk, and they were the star of the show. At least, the ones that made it into the pot and weren't eaten raw while I was cooking.
I would post a recipe for how to use them, but really, I think the best way to eat them is to enjoy them raw, or lightly steam them, greens, stems & all, and sprinkle with a little salt.
Since they grow well in colder weather, I'm thinking I'd like to try to grow them in my garden, if I could ever find a way to keep the dang squirrels from destroying everything that is planted out there!
For now, I'm just happy to be enjoying something new to me, something delightful that thrives when the weather is cold and the sunlight is scarce.
Until next time, I'll just be over here inhaling my Tokyo turnips with a big, dumb grin on my face!
Tuesday, November 30, 2010
Now, About that Winning Chili Recipe…
So sorry to keep you waiting! I got sidetracked by Life - you know, big stuff like…. getting engaged!!!!
And then my dear old dog Spider suffered a near-death experience and we thought for sure she wasn't going to make it. But judging by how shamelessly she continues to beg and how boundlessly she still runs up & down the stairs, I'm happy to say that she seems to want to stick around for a little while longer, and I'm thrilled and thankful for that!
So the news is good all the way around, yes it is! It's a win-win-win situation. Now let's get to talking about that winning chili recipe, shall we?
First things first - the recipe was inspired by this link: a very detailed recipe and worth reading!
And second things second - I cooked the beans using this method. And of course, it's ok to use canned beans if that's what suits your fancy.
As for the dried chiles, you can find them at your local Mexican market. And also, you can vary them if you desire. I used the ones I had on hand it it happened to turn out perfectly.
You'll see that the recipe calls for fresh habanero chiles, frozen. The reason for freezing them is because it mellows the heat significantly, and that's why you can use so many of them in one recipe without burning your pants off. And you can certainly use less or leave them out if that's how you like it!
And lastly... the recipe calls for Marmite. I've always thought of that as some weird thing my friends from across the pond like to keep in their cupboards. But let me tell you, it really adds something essential and robust to this chile paste, and I would not leave it out! In fact now I'm a little obsessed with finding other recipes in which to sneak a little Marmite!
And now, without further adieu…
Val's Award Winning Chili Recipe
2 dried chile California - with seeds
2 dried chile New Mexico - with seeds
2 dried chile de Arbol, seeds removed
1 1/2 T. cumin seeds
1 1/2 T. coriander seeds
1 t. unsweetened cocoa powder
1 T. coffee beans, very finely ground
1 star anise
2 T. tomato paste
2 medium pasilla chiles, diced
2 medium red bell peppers, diced
4 medium green bell peppers, diced
5 habanero chiles, frozen
2 onions, diced
6 cloves garlic, minced
1 T. oregano
4 cups vegetable stock
2 t. soy sauce
1 t. marmite
2 bay leaves
1 28 ounce can tomato puree
1/4 cup apple cider vinegar
1/2 cup tequila
15 cups beans - I used a combo of black, pinto, kidney and white beans. *See notes below.
1-3 T. brown sugar
Seed the New Mexico & Arbol chiles, and then toast them, along with the unseeded California chiles, in a hot skillet for about 1 minute or so on each side, just until they start to brown and smoke a little, and then set aside.
Toast and grind the cumin & coriander seeds and the star anise, and set aside.
Bring 1 cup of the stock to a boil in separate pan and add the toasted chiles and 1 habanero pepper. Simmer over medium heat until the liquid is reduced by about half.
Put this liquid/chile mixture, along with the toasted chiles and ground spices into a food processor or blender and add the ground coffee, cocoa powder, tomato paste, soy sauce and the marmite. Blend into a paste and set aside.
Fire roast the other 4 habaneros and then finely dice them. Easiest way to do this is to put them on a skewer and hold them over the flame on your gas stove, turning occasionally, until they start to blister & blacken.
Next up: saute' the diced onion in a couple tablespoons olive oil for about 8-10 minutes until starting to soften. Then add the fresh diced fresh chiles, oregano and garlic.
Add the diced roasted habaneros and the chile paste to the onions & peppers. Heat at medium high until the paste starts to sizzle & coat the pan. Then add the other 3 cups of stock and 2 bay leaves, plus the beans (see below), 1 28 oz. can tomato puree, 1/4 cup cider vinegar and 1/2 cup tequila. Don't forget the salt - I must have easily added a good tablespoon, but just do it to taste, adding a little at a time and letting it absorb fully into the chili. Cook until it's done! This should take 2-3 hours, stirring occasionally, over very low heat. Once it's done, add the brown sugar to your liking. It'll be even better the next day!
* I used all beans that I'd cooked in advance until *just* done - did not cook until terribly tender because the beans cook more in the chili. Here's the combination of beans I used:
6 cups black beans
2 cups pinto beans
4 1/2 cups kidney beans
2 1/2 cups cannellini beans
And that's it! Now that you've made your chili, it's time to enter it in a contest… or just invite 20 or so of your friends to come over & help you eat it! Either way, you can't lose!
Thursday, November 18, 2010
Full of Beans!
So as per my last posting, I've been crazily cooking dried beans in an effort to find out just how the hell it is that you really cook dried beans.
For years, I've been cooking beans from scratch but the results have almost always been entirely inconsistent. The same pot might have some beans that are perfectly tender, some that are overcooked to the point of exploding, and a few that are bordering upon raw. I mean, what the hell?!! They all cooked in the same pot! How could this be?
I have always cooked my beans slowly, at a low temperature, and more often than not, I soak them. I have always gone with the recommended standard of not adding salt until the beans are tender. But it never seemed to matter. I longed to be able to turn out the kind of beans in my kitchen that I'd get when I would go to a local Mexican restaurant and order a side of whole pinto or black beans: plump, perfectly tender and full of flavor, and with a velvety skin. Why couldn't I EVER achieve that kind of result in my own kitchen?!
Naturally, I turned to the experts but that only resulted in more frustration. Even Alice Flipping Waters says to just cover the beans with water and cook until they're done! Rick Bayless says that true Mexicans don't soak their beans, and that the key is to just cook the beans in massive quantities. Well, that might work for a restaurant but it's not necessarily practical for the average home cook. I consulted the Dona Tomas cookbook and the Joy of Cooking. Everyone seems to act like it's just natural to easily cook dried beans, as easy as breathing!
What the HELL?! I just couldn't accept that. I started asking around. A couple of my dear friends, Jamie and Kathleen, who happen to be fantastic cooks, admitted that they have the same problem with dried beans. They never cook quite right. I was sad to hear this but it also made me feel validated. Maybe I'm not just a complete bean-cooking idiot.
So I started poking around on the internet, consulting food science writing on the matter, and growing more and more frustrated. Most sources seemed to say it was simple - soak the beans (or don't), cook and don't add salt until the end. In fact, most sources say you'll ruin the beans if you add salt too soon - that it would in fact make the skins rupture before the beans were really done.
But then I stumbled upon a chili recipe which made the outrageous claim that you not only soak the beans with salt, but that you also add the salt when you cook them, right in the beginning. This was contrary to most everything I'd ever read, but I was willing to try anything at this point!
Right around the same time, I also found an article claiming that in order to make fool-proof, perfect beans, without even soaking, that you first boil them on the stove and then finish them in the oven. And I tried this method, both with soaked and un-soaked beans. And the soaked beans definitely had the best texture of any bean I'd ever cooked, but they still tasted a little bland.
So then, I tried first soaking the beans WITH salt, and then boiling and cooking them in the oven WITH salt, and lo and behold, I ended up with the most perfect batch of beans I'd ever cooked in my life. Tender and delicate but by no means mealy. Plump and juicy, salty and smooth, with hardly any beans having split open. Again... What the HELL?! It's contrary to what everyone says, but at this point, I couldn't care less! Because I've made several batches of beans this way now, and they've been by far the best beans I've ever cooked. And people, I have cooked a LOT of beans!
So here's my take on how to cook the most succulent dried beans:
First, soak your dried beans 8 hours or overnight in plenty of salted water. I don't measure much - if I have like a cup or two of dried beans, I add a teaspoon or so of salt. If I've got something closer to a pound, I might add closer to a tablespoon of salt.
After soaking, discard the soaking water and pre-heat your oven to 250. Put the beans in a heavy duty pot that has a fitted lid. Cover with fresh water by about an inch or so. Add more salt and any aromatics. Depending on the type of bean, I usually like to add half an onion, some crushed garlic cloves, a carrot or two, a bay leaf and either a splash of olive oil or a cheese rind - yes, a cheese rind! Adds a nice rich, salty depth.
Bring the beans to a boil on the stove. Once boiling, turn off the stove and put the beans into the pre-heated oven with the lid on the pot. Start checking after 45 minutes or so - depending on how long you've soaked, them, they may be ready that soon or they may take as long as 90 minutes. Recently I cooked black beans that took about 90 minutes - and they were hands down the most perfect pot of black beans I'd ever cooked - as good as the beans I'd get in the local Mexican restaurant, finally!! Cannellini beans using the same method only took 45 minutes until they were meltingly tender. Red kidney beans took about an hour. So you'll need to pay attention, but it's worth the effort, I tell you! I'll never go back to cooking beans the old way.
So that's more than my two cents on beans. Next up, I'm going to post my recipe for chili which features a big damn lot of beans! And yes, it's ok to use canned - I wouldn't blame you a bit if you opted for that - but in case you feel like using beans that you cooked from scratch (and saving a whole lot of money in the process, I might add!), then I urge you to try making them this way. And also, I'd love to hear about your results, too!
Happy bean making, friends! Stay tuned for that chili recipe!
Monday, November 15, 2010
We Are the Champions!
If you've been reading this blog for a couple of years, you may recall that one time, I tied for second place in a chili cook-off.
This event is always a blast, a wonderful good time featuring music and food and drink to benefit the Mother Ann Wright Foundation - a grass roots organization that feeds hundreds of people in need, every single day of the year.
Winning anything at all should have been thrilling, right? But honestly, I take my cooking seriously - a little TOO seriously, some might say, because instead of being excited that I won second place, I was sore that I didn't win first place. I mean, come on! It's a benefit, for crying out loud! A benefit to feed the homeless! What the hell was wrong with me?! Believe me, I asked myself that a lot around that time.
Fast forward to this year. I was excited to make chili just for the fun of making chili. I'd recently been on an insane quest to figure out the perfect method for cooking dried beans, and I think I've finally found it! That's going to require a separate post entirely!
In my quest to find the perfect way to cook beans, I stumbled upon this chili recipe, which looked amazing. But I wanted my chili to be veggie this year, so I decided to adapt it.
More importantly, I decided to make the chili just for the sheer enjoyment of it. I remembered my insane disappointment from not winning previously and knew that I couldn't let myself go to that place, and so I didn't. I just made the chili and served it up with no attachment to winning or even caring about winning.
But, guess what?

I WON!!!

I WON!!!
Sure was thrilling to snag that trophy!
And I have to send out serious kudos to J. Kenji Lopez-Alt over at Serious Eats, for the original recipe was his... and he freely encourages folk to use it as a starting point and adapt as they see fit, and so I did. I'll post my recipe soon, but first I have to do a separate post about cooking dried beans, so stay tuned, friends!
Subscribe to:
Posts (Atom)